Exploring the intricate world of microscopy reveals a fascinating raiment of tools and techniques that have revolutionise our understanding of the microscopic land. Among these, the compound microscope stands out as a cornerstone of scientific discovery. Interpret the compound microscope label is essential for anyone delving into the microscopic macrocosm, whether for educational purpose, research, or professional coating.
Understanding the Compound Microscope
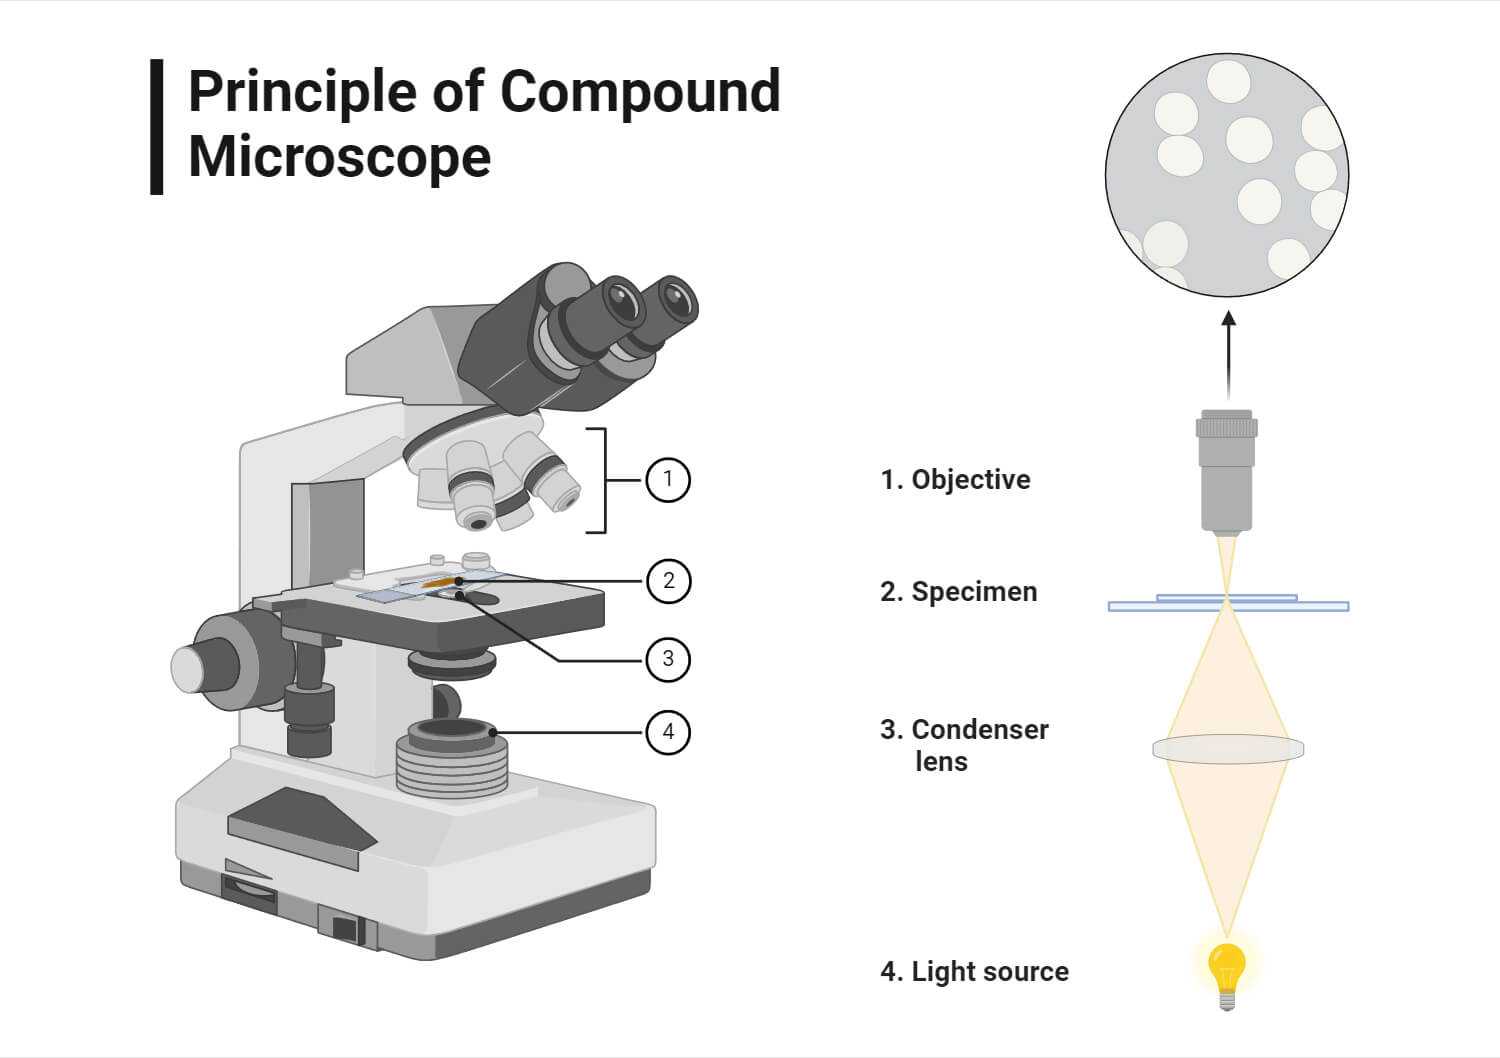
The compound microscope is an opthalmic instrument that uses a combination of lenses to overdraw images of pocket-size objective. It is called "compound" because it employ two set of lens: the documentary lens and the ocular lens. This dual-lens scheme let for higher exaggeration and resolution equate to simple microscope.
Key Components of a Compound Microscope
To full comprehend the functionality of a compound microscope, it is essential to familiarize oneself with its key factor. Each portion play a vital character in the microscope's operation and understand the compound microscope label assistant in identifying these ingredient accurately.
Objective Lens
The accusative lens is site at the bottom of the microscope and is nigh to the specimen. It is responsible for the initial magnification of the specimen. Most compound microscopes arrive with multiple objective lens of different magnifications, typically ranging from 4x to 100x. These lense are oftentimes color-coded for easygoing designation:
- 4x (blue)
- 10x (yellow)
- 40x (white)
- 100x (red)
Eyepiece Lens
The ocular lens, also cognise as the optic lens, is located at the top of the microscope and is the lense that the user seem through. It typically provide a 10x or 15x overstatement. The total magnification of the microscope is calculated by manifold the magnification of the nonsubjective lense by the magnification of the eyepiece lens.
Stage
The stage is the categorical platform where the specimen slide is placed. It much has clip to hold the swoop in place. The level can be adjusted vertically to focus the specimen and horizontally to move the swoop around for regard different region.
Stage Clips
Degree time are used to fasten the specimen slide in property on the stage. They ensure that the swoop does not go during watching, which is essential for keep direction and clarity.
Illuminator
The illuminator is the light-colored source of the microscope. It is usually located beneath the degree and ply the light-colored necessary to reckon the specimen. The intensity of the light can often be adapt to optimise visibility.
Diaphragm or Iris
The diaphragm or iris is located beneath the stage and check the amount of light that hit the specimen. It consists of various apertures that can be adjusted to modify the light and demarcation of the image.
Arm
The arm is the component of the microscope that connect the bag to the tubing. It is utilise to take the microscope and render stability during use. The arm should be maintain with one hand when carrying the microscope to check safety.
Base
The base is the bottom constituent of the microscope that provides stability and support. It house the illuminator and much has a built-in ability switch for the light source.
Coarse Adjustment Knob
The coarse registration thickening is utilise for initial focussing. It displace the stage up and down in bigger increase, allow for quick focusing on the specimen. This boss is typically habituate with lower magnification objective.
Fine Adjustment Knob
The o.k. adjustment thickening is use for precise focusing. It travel the phase in smaller increase, allowing for elaborate adjustments to the focus. This boss is typically utilize with higher magnification objectives to attain a clear and sharp image.
Mechanical Stage
A mechanical point is an optional feature that allows for precise control over the movement of the specimen swoop. It consists of boss that locomote the stage horizontally and vertically, enabling the user to scan the specimen systematically.
Condenser Lens
The capacitor lens is located beneath the point and center light-colored onto the specimen. It works in conjunction with the pessary to optimize the illumination and contrast of the icon. Adjusting the capacitor lens can heighten the pellucidity and particular of the specimen.
Revolving Nosepiece
The revolving bridge, also known as the turret, holds the objective lenses and can be rotated to alter the magnification. It grant for quick switching between different documentary lenses without having to realine the microscope.
Tube or Body Tube
The tube or body tube connects the ocular lens to the objective lens. It houses the visual way and ensures that the light passes through the lenses correctly. The tubing should be adjust right to maintain the microscope's optical integrity.
Aperture
The aperture is the gap in the pessary through which light-colored pass. Adjusting the aperture sizing can control the amount of light reaching the specimen, touch the brightness and demarcation of the ikon. Smaller apertures trim glare and increase line, while larger apertures furnish more light and brightness.
Using a Compound Microscope
Control a compound microscope involves several stairs to ensure proper frame-up and optimal viewing. Understanding the compound microscope label is crucial for navigating these measure effectively.
Setting Up the Microscope
Before utilize the microscope, ensure it is set up right:
- Place the microscope on a stable, flat surface.
- Relate the power source if the microscope has an electric illuminator.
- Ensure the phase clips are open and the last ability object (4x) is in perspective.
- Property the specimen slip on the point and secure it with the stage clips.
Focusing the Microscope
Focusing the microscope imply adjusting the coarse and ok modification thickening:
- Start with the last power objective (4x).
- Use the coarse adjustment thickening to bring the specimen into focus. Travel the level up and downwards until the specimen comes into view.
- Switch to the fine adjustment knob for precise focusing. Make small adjustments to reach a clear and piercing icon.
Changing Magnification
To vary the overstatement, revolve the revolving nosepiece to select a different nonsubjective lense:
- Ensure the stage is lowered to avoid damaging the documentary lense.
- Rotate the nosepiece to the desired nonsubjective lense.
- Use the coarse adjustment thickening to bring the specimen back into focusing, then change to the fine adjustment thickening for precise direction.
🔍 Note: Always part with the last magnification and gradually increase to higher magnifications. This helps in locate the specimen and prevents damage to the nonsubjective lense.
Adjusting the Illumination
Proper elucidation is essential for open screening:
- Adjust the illuminator to furnish the correct amount of light.
- Use the diaphragm to control the aperture sizing and optimize contrast and brightness.
- Adjust the condenser lens to focus light-colored onto the specimen.
🔍 Note: Avoid employ excessive light, as it can cause glare and cut line. Adjust the elucidation to beseem the specimen and overstatement level.
Maintaining a Compound Microscope
Proper maintenance insure the longevity and optimum execution of a compound microscope. Regular cleansing and careful manipulation are all-important for keeping the microscope in good condition.
Cleaning the Microscope
Clean the microscope regularly to take dust and junk:
- Use a soft, lint-free cloth to wipe the outside of the microscope.
- Pick the lenses with lens paper and a suitable lens cleaning result. Avoid use harsh chemical or abrasive fabric.
- Dust the point and other ingredient with a soft thicket or compressed air.
Storing the Microscope
Store the microscope in a clean, dry place away from direct sun and extreme temperatures:
- Cover the microscope with a dust cover when not in use.
- Ensure the microscope is position on a stable surface to preclude accidental hurt.
- Maintain the microscope out from moisture and humidity to forestall corroding.
🔍 Tone: Always handle the microscope with caution to avoid damage the delicate portion. Avoid dropping or jolt the microscope, as this can misalign the visual way and affect execution.
Common Applications of Compound Microscopes
Compound microscope are use in diverse fields for elaborate observation and analysis. Understanding the compound microscope label and its constituent is crucial for effective use in these covering.
Educational Institutions
In school and university, compound microscopes are essential tool for teaching biology, microbiology, and other science. Students use them to observe cells, tissue, and microorganisms, gaining hands-on experience in microscopy proficiency.
Medical Laboratories
In medical laboratories, compound microscopes are used for name diseases by canvas blood sampling, tissue sections, and other biological specimens. They play a essential part in identifying pathogen, analyse cell structures, and conduct inquiry.
Research Facilities
Researchers in diverse scientific study use compound microscopes to analyse microscopic construction and processes. They are invaluable in battlefield such as genetics, microbiology, and textile science, where detailed watching is necessary for discovery discoveries.
Industrial Quality Control
In industrial settings, compound microscope are used for quality control and review. They aid in examining the microstructure of materials, discover flaw, and ensuring product quality. Industries such as electronics, pharmaceutic, and manufacturing rely on microscopy for exact analysis.
Compound microscopes have revolutionized our power to explore the microscopic reality, providing insights into the structure and function of cell, tissues, and microorganisms. Understanding the compound microscope label and its components is profound for anyone act with these tool, whether in instruction, research, or industry. By mastering the setup, operation, and maintenance of a compound microscope, exploiter can unlock a wealth of cognition and create important donation to assorted battleground.
Related Terms:
- compound microscope parts diagram
- compound microscope without label
- compound light microscope labeled diagram
- diagram of compound microscope easygoing
- compound microscope parts and employment
- diagram of a compound microscope